Pool edging stones
These laying and grouting instructions apply to the laying and grouting of pool edge stones from the Croisette, Licia, Margo, Solum and Aquitaine series that are not driven over and are not constantly exposed to water or in direct contact with water (e.g. overflow behind the elements).
The pool edging stones are manufactured using natural aggregates in a special production process. This process ensures an unmistakable look with a consistently high quality. However, slight color variations may occur between the individual elements. For a harmonious laying pattern, we recommend using the contents of several pallets at the same time and mixing them when laying.
Check the perfect condition and quality of the products on receipt of the goods or before they are laid. Complaints regarding goods that have already been laid or installed cannot be accepted.
The pool edge stones are laid on concrete substrates, the contact surface of which must be wide enough to prevent any “tilting”. Before the elements are laid, the concrete substrate must be sufficiently hardened and the main shrinkage must be completed. This is usually the case at least approx. one month after the substrate has been created. The tiles can either be laid using the adhesive method or fresh in fresh in the bedding mortar. Before laying, the underside of the tiles should be roughened with a wire brush to increase adhesion.
Once the concrete has hardened, the pool edge tiles are laid using the “bonding method” with a suitable, plastic-modified medium-bed flexible adhesive. The processing guidelines of the adhesive manufacturer must be observed and adhered to. However, an average bedding density of approx. 10 to 15 mm should be planned for if the substrate is uneven. As an alternative to the bonding method, the pool edge stones can be laid on an approx. 3 cm thick, earth-moist mortar bed with an approx. 2 % (= approx. 2 cm/m) gradient to the external adjacent covering. In order to achieve an optimum bonding effect, the concrete substrate and the underside of the slabs must be provided with a bonding bridge and laid fresh in fresh with the mortar bed. This creates a stronger bond between the pool edge stones and the mortar bed.
As it cannot be ruled out that cuts will be required on site, it is recommended that the edgings are first laid loosely on the edge of the pool in order to determine the most suitable place for a cut. The edging should generally be laid before the adjacent decking is laid. Make the cut from one slab at a time to avoid dimensional differences due to cutting.
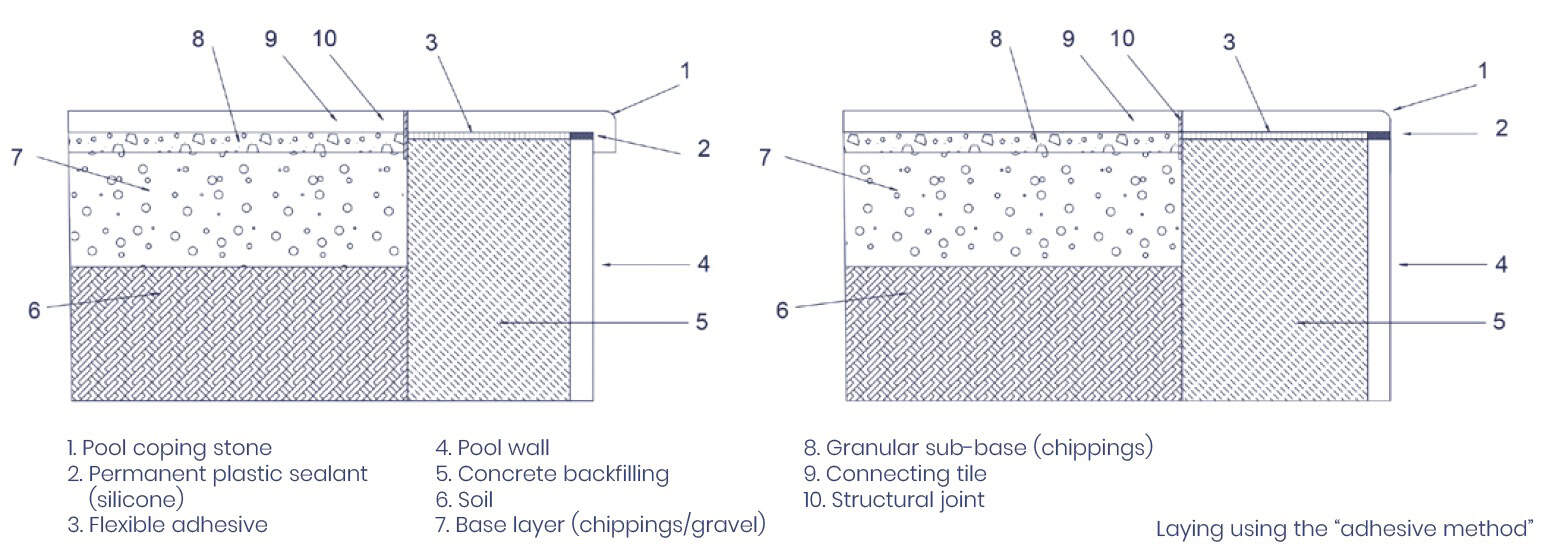
During installation, joints of approx. 10 mm width must be planned and created between the elements. The joints should be filled/grouted with suitable joint filler material that meets the requirements at the earliest 24 hours after installation. In addition to the joint filler specially matched to the color of the elements, plasto-elastic joint fillers or other commercially available mortars suitable for the intended purpose can also be used. The joints are filled using a trowel, spatula or syringe (depending on the material). A “crunchy”, i.e. jointless installation or filling the joints by slurrying is not permitted. Damage resulting from these causes cannot be recognized as grounds for complaint. Appropriate expansion joints with a width of approx. 10 mm must be created to adjacent components and filled as required. We also recommend creating an expansion joint on long sides longer than 6 – 8 m and in the corners.
Tip:
Calculation: Finished dimension/radius “Pool inner wall area” = “Dimension” specification for edging elements (see available radii). Example: With a pool diameter of 500 cm (finished radius “pool inner wall area” = 250 cm), the “inner rounding R 250” edging elements are required.
The Croisette and Licia pool edge stones and connecting slabs are laid with a joint width of at least 3 mm. The joints should be filled/grouted at the earliest 24 hours after installation with suitable joint filler material that meets the requirements. In addition to the joint filler material specifically matched to the color of the elements, plasto-elastic joint filler materials or other commercially available mortar suitable for the intended purpose can also be used. The joint is filled using a trowel, spatula or syringe (depending on the material). A “crunchy”, i.e. jointless installation or filling the joints by slurrying is not permitted. Damage resulting from these causes cannot be recognized as grounds for complaint. Appropriate expansion joints with a width of approx. 6 mm must be created to adjoining components and filled as required. We also recommend creating an expansion joint on long sides longer than 6 – 8 m and in the corners.
Example of laying Licia composite pool edging stones and patio slabs:
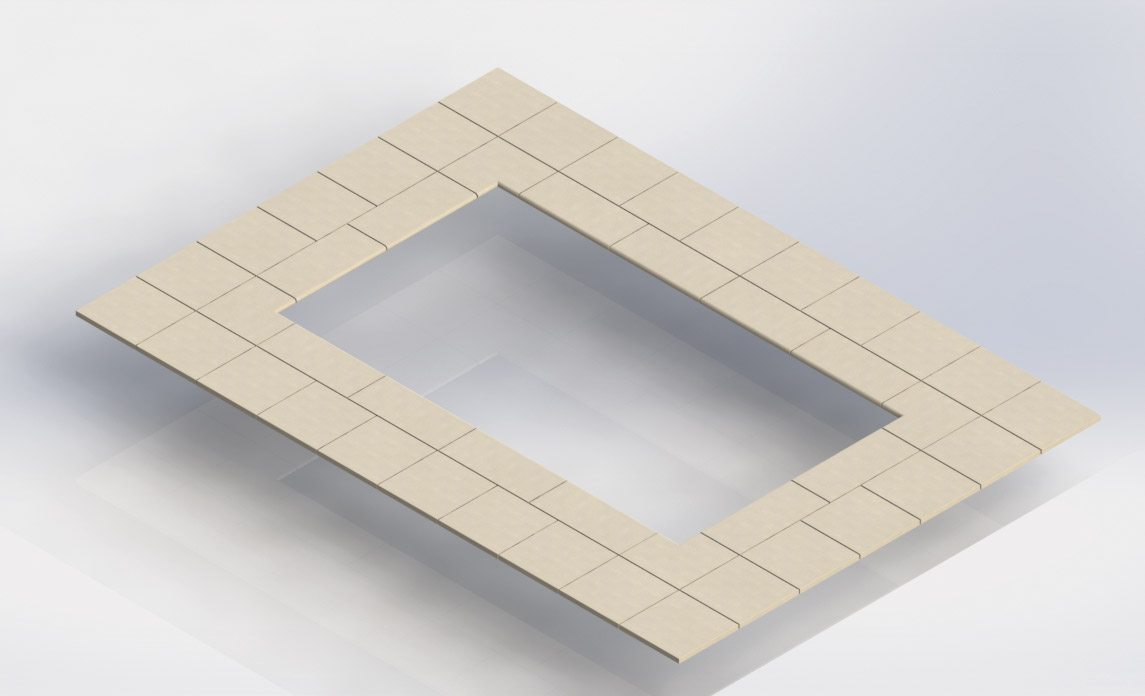
Installation with 90° inside corner
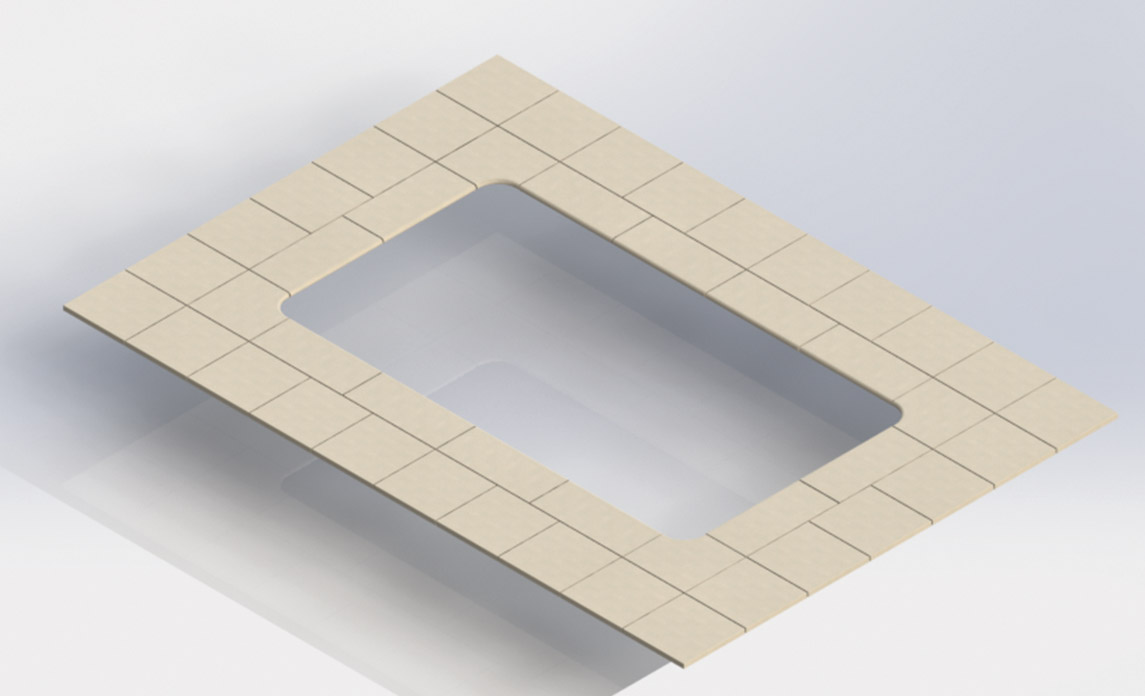
Installation with R15 and R20 (inside corner with rounding)
After laying and grouting, it is advisable to impregnate the pool edge stones. This keeps the elements looking fresh for longer, protects against soiling and makes regular cleaning and maintenance easier – because unfortunately it is not possible to do without it. A suitable special impregnation and cleaning agent can be obtained from specialist retailers. Alternatively, commercially available products can also be used, whereby the manufacturer’s instructions must always be observed. The impregnation (water-based) is applied to the dry, dust-free elements by rolling or spraying in accordance with the processing guidelines. Depending on the stress and weather conditions, re-impregnation may be necessary every 2 to 3 years. Intermittent cleaning should be carried out with neutral to slightly alkaline, commercially available cleaners. Acidic cleaners should be avoided. They can have a negative effect on the impregnation and the surface of the elements. High-pressure cleaners must not be used to clean the elements, as this can damage the surface of the covering. Instead, it is recommended to “scrub” the pool edge stones manually using the cleaning agents mentioned and then rinse them with a soft jet of water (low pressure). The manufacturer’s instructions must be observed.
TERRACE SLABS
Croisette | Licia | Margo | Solum | Aquitaine | Opus
These laying and grouting instructions apply to the laying and grouting of pool edge stones from the Croisette, Licia, Margo, Solum and Aquitaine series that are not driven over and are not constantly exposed to water or in direct contact with water (e.g. overflow behind the elements).
The pool edging stones are manufactured using natural aggregates in a special production process. This process ensures an unmistakable look with a consistently high quality. However, slight color variations may occur between the individual elements. For a harmonious laying pattern, we recommend using the contents of several pallets at the same time and mixing them when laying.
Check the perfect condition and quality of the products on receipt of the goods or before they are laid. Complaints regarding goods that have already been laid or installed cannot be accepted.
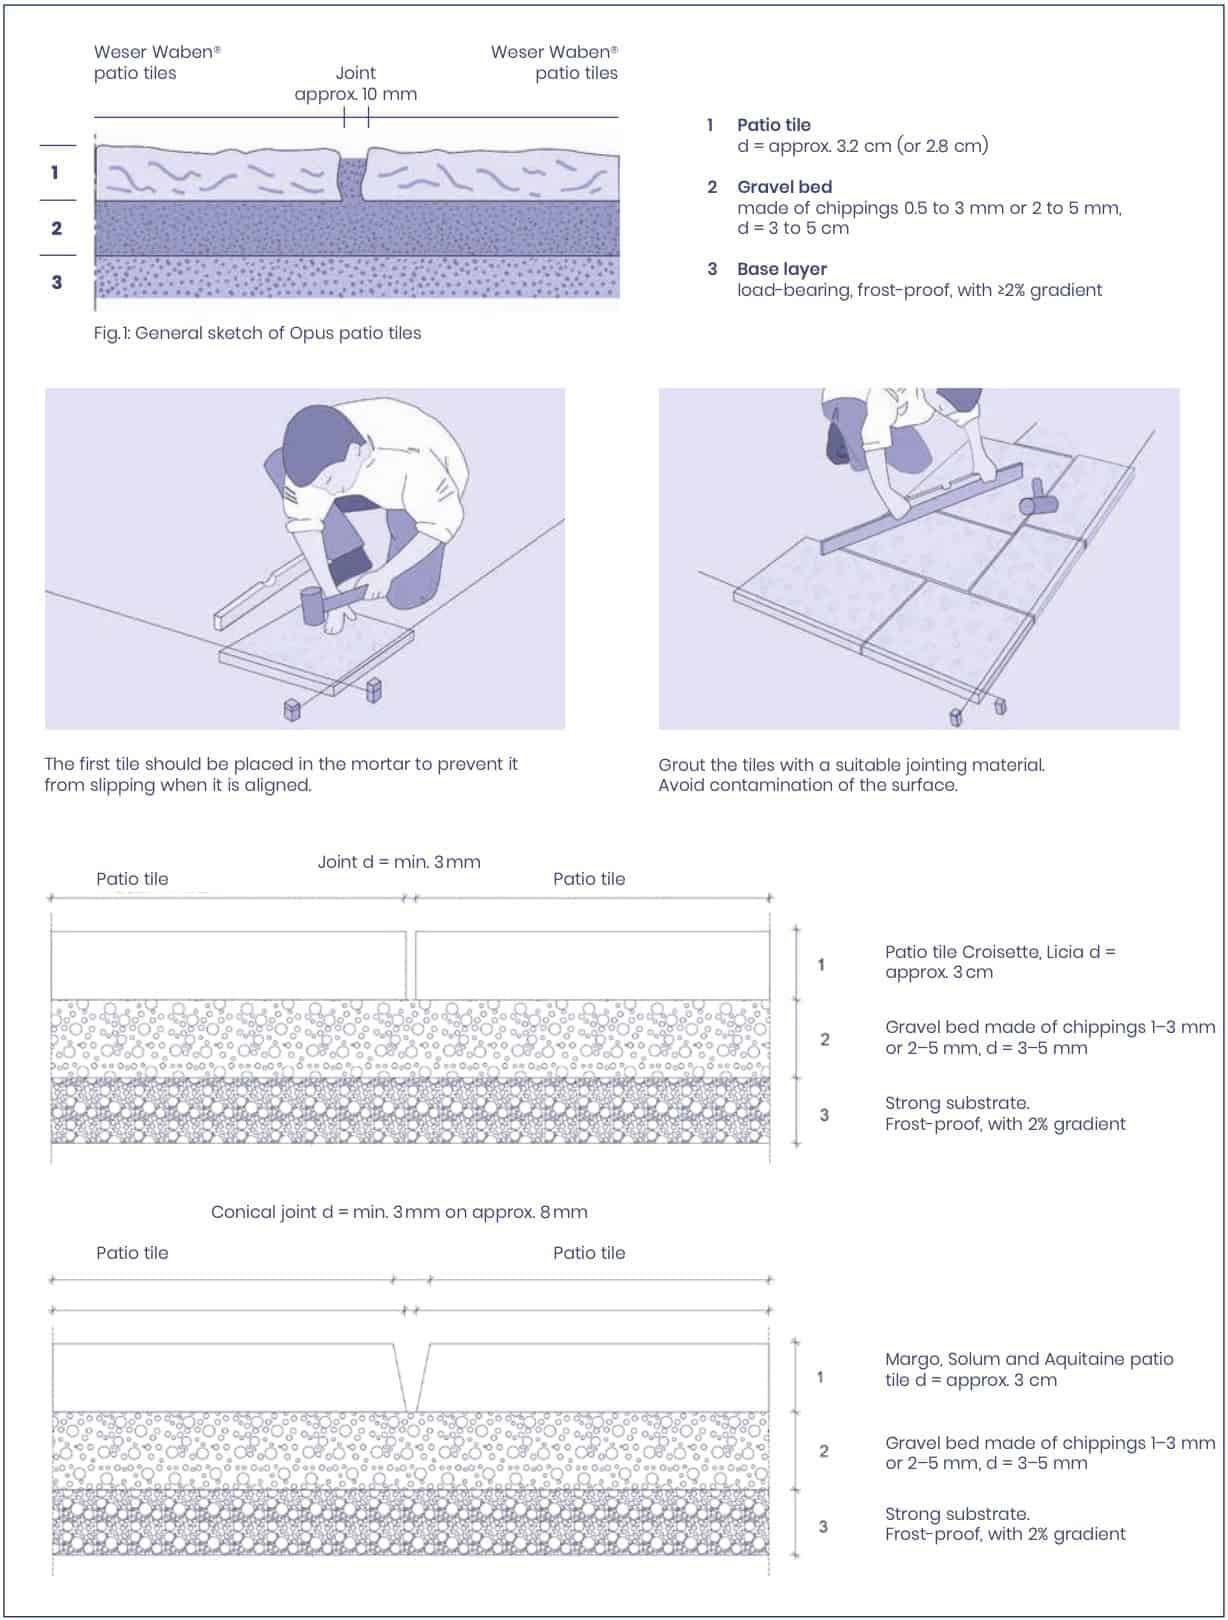
General information: The terrace slabs are primarily intended for terraces, balconies and loggias. They are also suitable for access routes and house entrances, etc., but not for driveways. A load-bearing and frost-resistant substrate that meets the respective requirements is the most important basic prerequisite for creating a flawless slab covering. Before laying, the underside of the slabs must be roughened with a wire brush to increase adhesion. There are basically three different laying options:
Variant 1: Unbound construction method with laying on level ground on a compacted, load-bearing and infiltration-resistant, frost-proof substrate in layers in a chippings bed, consisting of chippings 1 to 3 mm or 2 to 5 mm, on an approx. 20 to 25 cm thick, compacted gravel-chippings-sand mixture layer (Fig. 1).
Variant 2: For a permanently stable laying of the slabs, also in conjunction with a maintenance-free fixed jointing, laying in partially bonded construction is possible. In this case, the slabs are laid fresh in fresh in a water-permeable bedding mortar or mono-grain mortar (4-6 cm) with a bonding bridge applied to the back. A base layer must be produced in the same way as for the unbound construction method. Special case: concrete substrate in outdoor areas. When laying on an existing concrete substructure (e.g. (roof) terraces, balconies, loggias, etc.) with an appropriate slope, possibly with masking and insulation, the bonded construction method is to be preferred. A drainage mat underneath the bedding mortar is required to prevent waterlogging.
Variant 3: Laying for indoor use on a non-bonded, non-insulated concrete slab. Here, the tiles are laid on 5 mortar points, whereby the mortar consistency should be such that the mortar can spread under the entire tile when tapped to ensure a high load-bearing capacity. Suitable joint filling materials should be used when laying the slabs in the mortar. In general, the “grit bedding” (variant 1) should be given preference over all other laying methods.
In order to achieve a uniform and harmonious overall appearance, the slabs must be removed from several pallets at the same time and mixed. When laying the slabs, ensure that there is a sufficient gradient (≥2%) and that the slabs are fully supported on the chippings bed.
The terrace slabs are handmade. Natural materials are used, which are subject to natural fluctuations. Due to these variations within the aggregates, color and structural deviations in the slab surfaces are unavoidable and even intended. They are reinforced by slight differences in height in the individual slabs and thus emphasize the natural character.
The dimensional tolerances in length and width can be up to approx. ±3-5 mm. A height difference in density of up to ±3 mm is permissible. The terrace tiles must be tapped in with a suitable rubber mallet. Always use color-neutral, non-coloring rubber mallets. An angle grinder (Flex) or a water saw is suitable for cutting the slabs. Do not use vibrating plates or roller vibrators!
Jointing: the terrace slabs must be laid with joints approx. 10 mm wide! Exception Licia: A joint width of at least 3 mm is taken into account for the Licia line! Laying without joints is not permitted.
Expansion joints must be created between the slab covering and adjacent fixed components. In addition, expansion joints must be created after a laying area of at least approx. 25 m2 . In the case of so-called “loose” laying of the slabs in/on a bed of chippings, joints must be filled with a jointing material that is suitable for the joint width and the bedding material (e.g. chippings 0.5 to 3 mm or 2 to 5 mm). The joints must be filled to saturation with the jointing material. Alternatively, equivalent products from other manufacturers can be used.
The use of grout may cause the surface of the terrace slabs to change over time (slight sheen/more intense color). In any case, the manufacturer’s instructions must be observed and complied with. Dark, damp edges on the slabs, which may appear after installation, are usually due to moisture from the bedding material. After drying, these edges are no longer visible.
The dimensions of the terrace slabs, the permissible dimensional tolerances and joint widths are included in the specified requirement for terrace slabs in m2 area. Deviations in the specified joint widths lead to an increased or minimized requirement per m2.
